ART375 - Photographic Processes of Printmaking
Pre-Press Registration and set up

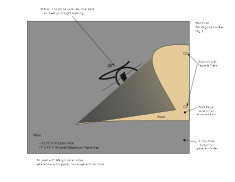
The Pin Registration system is used for making extremely accurate registration – a must when ever you are developing a 4 color CMYK print .. but the system works well for any type of printing, even a single black and white run.
The system relies on using a specific set of holes punched in all of the parts of the edition.
A bar with two pins placed at the same position as the holes that are punched.
All of the
1) Paper for the edition is punched with the hole punch
2) The matrix is punched with the same hole Punch.
3) A large sheet of mylar is punched with the same punch.
4) A small strip of old litho plate is punched and two pins the size of the holes is placed in the strip.
Together all of the above will make up your registration system. An it all relies on every thing being placed on the pin bar to work. Fig 1 above.
After all is punched and you have made a transparency. Follow the following steps.
- Place the paper print side up over the pins on the pin bar
- Place the mylar over the paper and on the pins
- With your image transparency right reading and emulsion up (just the way you want it to look on the print) Looking through th Nylar to the paper .. move the image transparency around an adjust the position of where you want the image on the paper and tape it to the mylar.
Exposing the Plate
These step are to be done in subdued light
- With the image attached to the mylar and with the litho plate
- Put the pin bar with pins through the plate holes from the back of the plate (so the pins are sticking up through the plate) emulsion side facing up toward you.
- Place the mylar over with image transparency on the pins.. the transparency should be touching the plate directly –EMULSION TO EMULSION
Exposure Times
Remember that all photomechanical processes are HIGH CONTRAST
In theory, you want the shortest exposure possible, while still exposing the plate long enough that the non-image areas of the plate develop away cleanly or only leave a very faint haze. When testing translucent materials, it is easy to determine the correct exposure by making several test plates in small increments, and finding when the fog or haze left on the plate by the translucent film fully disappears during developing.
Every Matrix has its own proper exposure time.
Suggest exposure settings:
.003 Drafting Film (Single Sided): 16lu
Artex Textured Film: 22lu
Pictorico OHP Inkjet Transparencies: 28 lu
Exposing & Developing Your Plates
- Turn on the Plate Maker if it is not on- and let it warm up for 5 minutes.
- Select the proper side to use for exposures
- Deep side for sceen prints
- shallow side for intaglio and litho
- Open the glass carefully and make sure the door is propped up
- (Do not trust the glass to stay up on its own!)
- With the Mylar and plate Sandwich – Image Transparency in between place them on the plate maker
- Close and Lock the handle
- Turn on the Proper vacuum
- Flip the lid by pulling out the spring loaded lock pin on the right front side
- As soon as the top is free to rotate let the pin go and allow the top to come to a locked position ready for exposing.
- Set the key pad to the proper units for your exposure.
- Hit the T key for exposure.
- When exposure is completed flip the top back ove and lock in place
- Turn off vacuum
- After Vacuum is of you can un-latch the handle and open the glass.
- Take out your plate and put it in a developing tray. Pour a generous amount of developer onto your plate and quickly begin working the developer across the plate. Make sure you develop the edges of the plate completely. Development should take about 1 – 2 minutes.
- When finished developing .. all blue in the non image area should be cleared out – if un sure then hit it again with fresh developer one more time.
- Wash and rinse both sides of plate well with water. Squeegee off the excess water and allow your plate to dry.
- Sponge a thin layer of water on the plate and shake up the Finisher/ Cleaner/Preserver. Apply a thin layer of the FCP to the plate with a sponge at the press with the vent turned on. Smooth down with the sponge and allow to dry.
- You are now ready to mix your ink, prepare your paper and begin printing!
Printing
Prepare Paper and Newsprint
Prepare as many sheets of newsprint as sheets of paper you will be printing plus at least 4 extras. The newsprint should be larger than your printing paper.
Setup the Press for Printing
Center your plate on the press bed with (slide the plate around with a little water underneath to get it to stick) and set the plate over the pins at the press and install a scraper bar that is narrower than your plate but wider or equal to the width of your paper.
Grease your tympan, set pressure and traverse marks. Be certain that the scraper bar will not start before the pins on the plate or run off the end of the plate.
Get two bowls, one with about 1 liter cold water + 1/2oz Glycerin and 1/2oz Gum Arabic. The other bowl should be empty and is used to discard dirty water. Lay your paper and newsprint in two separate piles on the table next to the press.