ART 484 - Creating Bitmap Textures in Photoshop.
Page 4
I found some early abstract digital art images from a 1994 Xaos CD that looked great and I decided to play with them to learn how to use PSD (Photoshop) layered files in Maya. The images were not tileable, and in many cases I left them that way. Each texture was treated in similar ways as the preceding pages of this tutorial to make bump, specular, and transparency maps. I then just set up a scene to see how they would look.
Again, these examples are just to show how an artist can have immense control over how an animation looks, if s/he uses drawing, photos, and collages in Photoshop to create bitmap textures.
This is a sampling of 4 of the original images used for this demonstration

Semi-Transparent Map
For this particular image, I wanted to treat it as shiny fabric that was transparent where it was black.
|
|
|
Transparency Map. |
Maya has the ability to work with Photoshop (PSD) files and access individual Layer Sets. This means that one Photoshop file can provide numerous and aligned images for a render. In this example, we are using it to add different maps to one shader. You can also use Photoshop Files to create Layered Shaders, but that is another day. Maya can also export shaders out as PSD files.
The first few times you use PSD files in Maya, it can take a lot of work, but the payoff will be once you get quick at it. With all the maps for a shader in one file you can quickly move and organize files. More importantly you can quickly rescale images for different resolutions of textures.
 |
NOTE: Maya CANNOT access individual layers. It can only access LAYER SETS or "Groups" as Photoshop calls them. Usually you will have one Layer in a Layer Set. You can create a Group or Layer Set in the Layer Editor by clicking on the folder icon, or in the drop down menu. Use Maya's convention of placing periods or dots to distinguish a node's name from its attribute. In this example the shader is called "patina" and each attribute is labeled after the period. This shows a Photoshop file ready to be saved for Maya. It contains a color, bump and specular map. Each is in its own Layer Set. There has to be a background layer, but Photoshop will not let you put the background layer in a Group. You end up not using the background layer. |
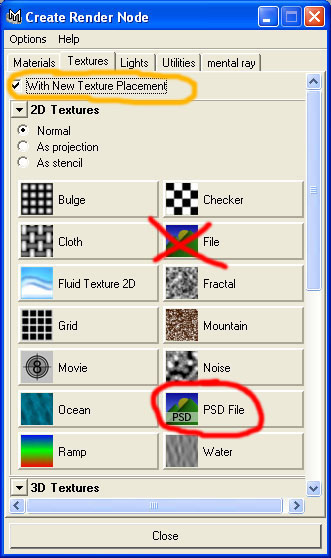 |
Create the type of shader you want. However, when you want to place a bitmap texture for it, DO NOT select the usual File node. Select the PSD File node. Also, if you need Texture Placement nodes (for example, working with Nurbs surfaces) you will only need one. All maps should be connected to this one Texture Placement node so you can easily change the placement of ALL the files at once. You might want to turn this off for subsequent PSD Files nodes in the Shader's network.
|
 |
In the PSD File node you will be able to select your Photoshop File. Just below the usual Image Name selection area are some new windows. "Link To Layer Set" is where you pick which Layer Set you want to use. In this case we are activating the color map. With the PSD node you can also select different Alpha Channels to
use. This tutorial is not showing this, but you could save numerous
"Channels"
in Photoshop and bring them in separately to Maya. The lower selection box, "Alpha to Use", is where you would do this. In this case, I am not using it. You would repeat this process for every different file texture you want to use. NOTE: You create a PSD File node for EACH file texture. |
 |
The finished shader network in the Hypershade should look like this when completed. There are 3 PSD nodes, each accessing the same Photoshop file. Each using a different Layer Set to bring in a different image. All 3 PSD nodes are being placed by the same Texture Placement Node. |
Finished Render in Maya using all PSD nodes and these 90s images.
Note the
semi-transparent fabric with sheen.
The yellow-green ball is playing with
translucence and that is why it appears to "glow" a little and
does not have as much shadowing.

Page 4