ART 488 - Creating Bitmap Textures in Photoshop
This page is designed as a supplement to lectures. It is not intended to be a stand alone tutorial.
Using bitmap textures that you have created from photography, drawing, painting or collage, gives you much more creative and technical control over how your renders will look. Many times, they will speed up your render times - meaning that the time you spend in Photoshop creating correct color, bump, transparency, reflection and/or specular maps, is well worth it. Also, textures can be used over and over. If you spend the time to create good textures, you will slowly create an excellent library that you can use for many projects.
Following are a number of examples and tips for making good textures that seamlessly tile.
Bitmap textures are loaded into RAM, both for 3D animation programs and for video games, and its a good habit to start creating bitmap textures in specific sizes that relate to the "powers of 2" ( 2, 4, 8, 16, 32, 64, 128, 256, 512, 1024). Bitmap textures are usually square , 256 x 256, but they can also be rectangular, 128 x 512.
The size of your texture is important. If it is large, but will rendered small in the scene, then the computer is wasting a lot of cycles just throwing away data it doesn't need. If the texture is small, but it will be rendered to fill the entire scene, it will display pixel artifacts. When selecting what size texture to create, take into consideration how large it will be displayed in the scene. It can also be wise to create two sizes: one for far away shots, ie.64x64; and one for close-ups i.e.. 1024 x1024.
Creating tileable textures is very important to fast and successful renders
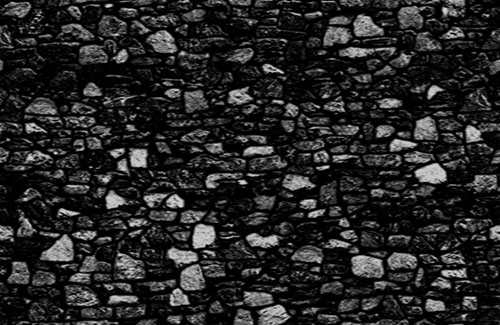
Stone Wall
 |
This is the original picture for the
stone wall. It is shot late in the evening. The color is incorrect,
plus the exposure varies across the surface so it needs some work to
make it tile seamlessly. However, the camera is positioned correctly
with the wall being photographed straight on, so there is no apparent
perspective distortion. |
|
Photoshop>Filters>Other>Offset This filter offsets the image by a user selected amount of pixels and wraps it around. We could start Clone Stamping to the erase the lines, but the varied exposure should be fixed first. Obtaining a even exposure across the image can be accomplished with the Dodge and Burn tools. It can also be down with making Selections, feathering the edges of the selection, and then performing a Levels adjustment on the selection. To remove the Offset Filter, use History, UnDo, or reverse the numbers in a new Offset Filter. |
 |
In this example, since the exposure varied evenly across the whole image, a duplicate layer was created; a layer mask was applied to the new layer (see arrows), and a gradient was applied to the layer mask so as to gradually reveal the layer on top of the the lower layer. Play with the opacity of this layer to achieve the correct blend. Now the top layer can be varied with a Levels adjustment, the gradient, and the opacity. You can achieve any effect of burning or dodging that you need |
 |
Here is the finished image. The Clone Stamp and the Selection Tool has been used carefully to place stones across the seam so as to hide it. Keep using the Photoshop Offset filter to check your results. |
 |
Once the color map is complete, additional needed maps can be created as layers in Photoshop. This keeps all your files organized, and it is easy to make updates. For example, in one step you can make different resolutions textures for all your maps: 128x128 and a high res one for close-ups, 1024x1024. For the stone wall texture we need a bump map to give the appearance that the stones stick out from the mortar. We will also make a specular map. |
 |
For the bump (or displacement) map, the lines for the mortar need to be created by hand. This will give the effect that the mortar is deeper into the wall than the stones
In Photoshop, create a new layer and quickly paint black lines wherever there is mortar. You can do this pretty fast.
Apply a Gaussian Blur to it at the end. |
 |
To continue to achieve a sophisticated and accurate bump or displacement effect, some rocks need to appear that they are slightly further out on the wall than others. Using the Magic Wand on the layer that has the mortar lines, you can quickly select whole stones and color them different shades of gray. |
 |
To create the final bump map, the mortar lines are combined with the flat shades of whole rocks, and a high contrast black and white image of the wall. This will a create a very realistic illusion of a 3D wall |
 |
For the specular map, the mortar lines were combined with a different flat shaded whole rock image (not shown separately here) with an even darker image of the wall. Mortar is not "shiny" and thus its part of the map should be black. Different rocks have different specular attributes, and thus the flat shaded rock areas will give this effect, and finally, rocks are composed of different materials and the high contrast dark image will make parts of individual rocks react to light differently. |
|
Once all the textures are completed, you can create the appropriate resolution for your render. Take into consideration how many times you expect to tile the texture on your object and how large in the frame it will be rendered. Remember to use "powers of two" for sizes. Don't worry if the image looks squished. You will stretch it back out in Maya. Save textures as jpeg or tiff files.
By creating all the related images in one Photoshop file, you can easily create new resolutions. For more information on using Photoshop files in Maya, see page 4 of this tutotial. |


Finished Render in Maya using all three maps

Page 1
Page: ..1... 2.... 3.... 4....5 ..