
This page is designed as a supplement to lectures. It is not intended to be a stand alone tutorial.
This is a simple approach to block modeling a human head. Some attention will be paid to creating edge-loops around the eyes and mouth and when possible quads will be used. This, however, is a beginning level project. For advanced polygonal modeling of a head there are many tutorials available on-line and in text books.
Another method to get excellent polygonal models is to generate the surface from curves. You would do this in the same way as modeling for NURBS, but in the end you would create polygons - one for each vertices. To see this method, check out the Modeling NURBS Head Tutorial
Model Sheet and Set Up
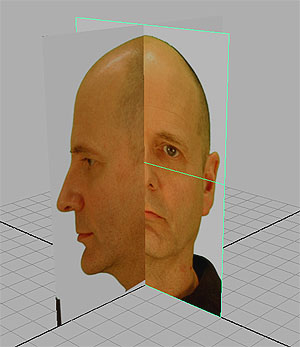
Create a model sheet where each view is the exact same size and alignment. This can be used as an image plane, or mapped onto geometry in the scene.

In this example, we are only using the front and side views.
|
 |
| Create a cube with 4 subdivisions on each axis. Extrude 12 faces down 3 times to make the neck. Delete the bottom faces of the neck. You won't need them. | 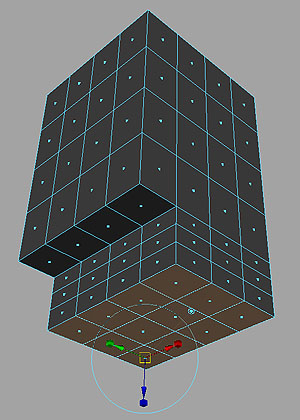 |
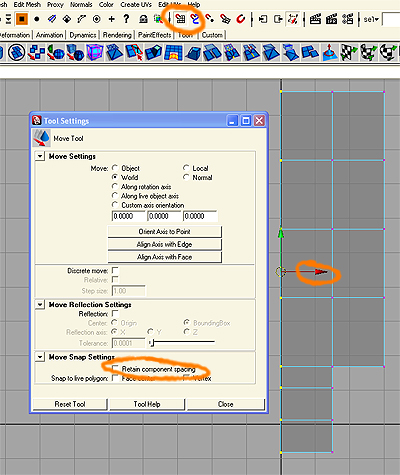 |
From the front, delete half of the cube and neck. You will make a mirror copy of the half. Make sure the open center of the cube is directly on the y axis. This will make a seamless mirror. To verify that the edge of the geometry is directly on the axis, you can do a constrained snap of vertices. Select all the vertices at the center edge. Open the options for the move tool, Modify>Transformation Tools>Move Tool>Options. Turn OFF "Retain component spacing." Activate Snap to Grid by turning it on in the top menu or simply holding down the x key. Mouse click on the x arrow of the move tool and this will constrain the vertices to just that axis. Move them away and then back to the center point. They will snap. If you mouse click on the center of the move tool icon, you will not constrain the vertices and they will all snap together at one point. |
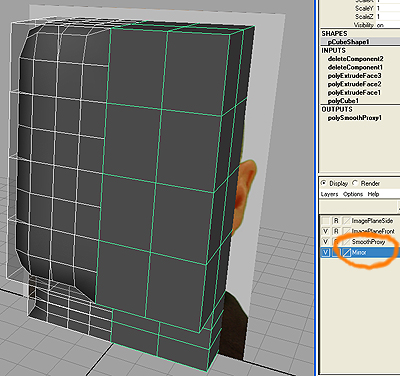
There are many methods for modeling and viewing a smooth proxy of your model. In this example, make a mirrored duplicate instance of the half, Edit>Duplicate Special>Options. Set X Scale to -1. If you have done it correctly there should not be a seam or overlap between the two halves. Now select the mirrored instance and create a smooth proxy of it. Proxy>Subdiv Proxy. It can be helpful to have the mirrored instance and the smooth proxy on separate layers. You can now turn them off and on when you need to see them.
|
 |
Beginning
Wrangle the vertices around until the cube has taken the over all shape of your head. Feel free to use the Sculpt Tool. Try to keep the spacing of faces even and the lines going straight and even.
Don't worry about the nose or ears at this point.
Although its early in the process, paying attention to where these lines are is important. The more experience you get with modeling in this manner, the better you will understand where to put edges in the beginning. Get in the habit of trying something and then redoing. Don't get caught in the trap of thinking you can work your way out of a problem. Many times its quicker and better to start over. Save your work a lot at each important step. |
 |
| Insert some Edge Loops to give more data in areas that need more basic detail. Edit Mesh>Insert Edge Loop Tool. | 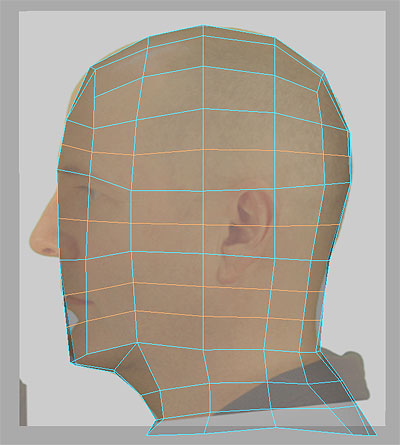 |
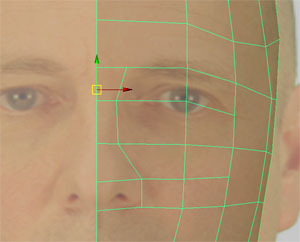 |
Use the Split Polygon Tool to draw the curve of the nose. |
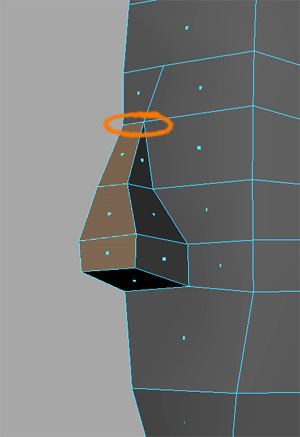
Select the lower 3 faces of the nose and extrude them out. Rotate them and/or wrangle the vertices until they match the angle of the nose.
At the top of the nose you will have a small face that is not needed and will cause you problems. You can remove this face by merging the vertices. Align the left two vertices on top of each other and then do the right two vertices. Merge them. Edit Mesh>Merge>Options. Set the Threshold to something slightly higher than zero. Check in the Channel box and visually to see that the vertices have been merged and there is no longer a face. |
 |
Select the 4 faces that make the eye area. Extrude and scale them down. Repeat this 3 times. You now have edge loops around the eye that will help create accurate movement. |
 |
Wrangle the vertices to create a nice rounded eye socket. If you are making a separate eye, you will eventually delete the center 4 faces. Check your progress with the smooth proxy. |
 |
|
Do the same extruding process with the mouth area. This time select 9 faces that make up the whole mouth area. This will create large edge loops around the mouth that will aid in animation.
|
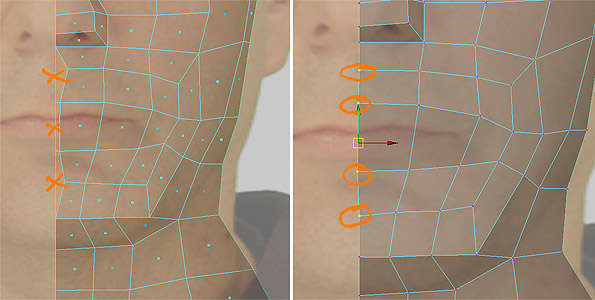 |
This process will create some extraneous faces on the center line that need to be deleted. Delete 3 faces as indicated and then constrain snap to grid the vertices back over to the center line. Keep moving the vertices into clean even circular shapes around the mouth area. |
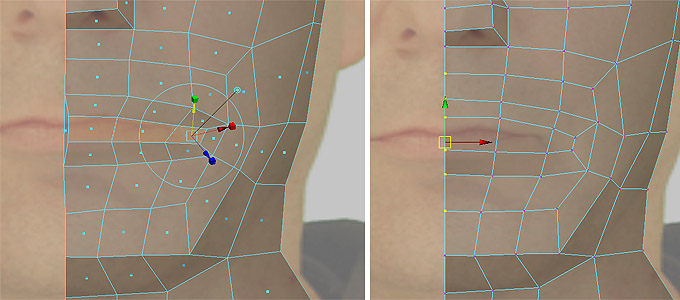 |
Repeat this process, but this time only pick the center 3 faces directly over the mouth. Extrude and Scale them down. You will have to delete the little extra center face and snap the vertices back to center. |
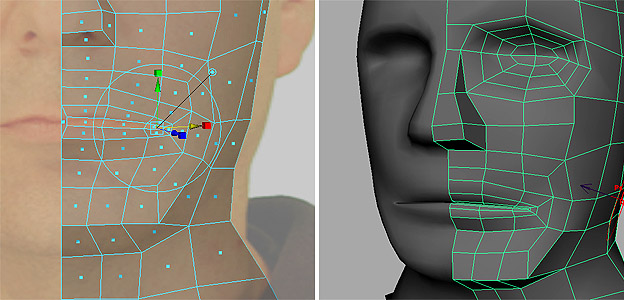 |
Repeat this process on the center 3 faces at least once more, but you may need more. Finally you will want to delete all 3 extruded faces when they get very narrow. This will be the opening of the mouth between the lips. You will need to continue appending or extruding edges to carry the lips back into the mouth. Keep checking that the gap is clear to the center and that all the center line vertices are snapped to the grid. Double check your progress with the smooth proxy. |
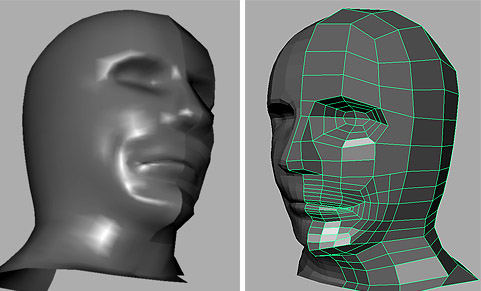 |
Applying a Phong Shader to the model and its smooth proxy can better show you where areas need to be smoothed.
Also, you can use Flat Shaded, as opposed to Smooth Shaded to see potential problem areas in the modeling. Use the smooth tool to smooth things out, but it tends to shrink things. You will have to pull items back out. Starting in Maya 8.5, there is a new "smooth tool" that tries not to shrink the volume of the shape. |
. 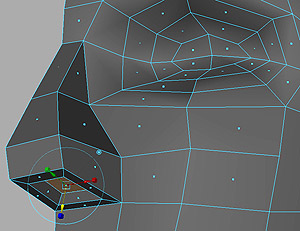 |
Select the face on the underside of the nostril. Extrude it and scale it in. Then extrude it and move it up. You now should have a basic head shape. |
Finishing Up
The next steps are adding in edges to create an even mesh of quads across the head and provide areas of detail. This example shows 3 steps on how to take an 6 sided polygon and turn it into quads. Go slow, look carefully, and try to figure out how to create and maintain quads. Keep experimenting and redoing until you get what you want. |
 |
| Use the "Insert Edge Loop Tool" and Split Polygon Tool to add in edges. This example obviously extends the lines defined by creating the eye. | 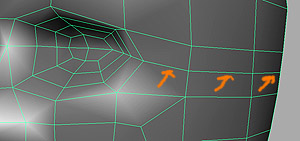 |
Here is a more complicated example of cleaning up potential triangles and providing more detail. The marked edge is deleted so that it can be moved. Additional lines are added in.
This takes practice to start seeing how to do this and many times there are numerous ways to fix something. |
 |
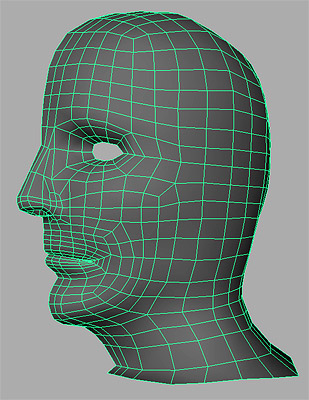 |
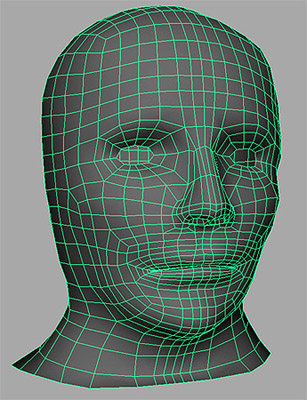
This is a basic shape for a head. Its not too dense, its pretty even, it has detail where it needs it, and its 100% quads. It is from this that smaller detail can be added. The particular shape of the eyes, nose, nostrils, lips, chin and cheeks give the characteristics that make an individual. The next step is working as a sculptor to give character to your model. Some tips:
|
 |
When you are finished, or if you want to really see and work on the whole head, you can create the final full head. Delete the mirrored instances and/or proxies. Then, select the geometry and perform a Mesh>Mirror Geometry. Check the options and verify that "Merge Vertices" is on. This will create one solid shell for the whole head. Now if you want to smooth out the seam or continue to tweak the model, I would suggest you use the Sculpt Tool and turn on "Stroke>Reflection". This allows to to mirror your brush strokes across the two sides. The model will remain symmetrical. |
To create ears, you can check out this tutorial. Its advanced and would be a good follow up to this. If you are not familiar with finding tutorials on the web to teach yourself, now is your chance to start. For this assignment you can just "stick" on the ears and group them to the head. If you want to do a better job, you would need to change the faces where the ear will be added and attach them seamlessly. This tutorial is at highend3D.com - one of a few really good sites for maya information, tips, forums, and tutorials.
Figure out how to do the eyes yourself. Let Google help you. Basically you will be creating a separate sphere for the eyeball, putting it into place, and then creating more edge loops around the eyes to create the eye lids. You will also have to extrude the edges of the eyes out, creating more geometry, so that the eyelids will cover and match the shape of the eyeball. You will also need to have enough geometry to make the eye lids shut - if you want your character to blink his or her eyes.