ART 484 - Advanced 3D Animation Techniques
Adding Attributes, The Connection Editor, and Create Character Set
This page is designed as a supplement to lectures. It is not intended to be a stand alone tutorial.
Locking Channels
In many situations the animator only needs to animate one or two particular channels of an object. In the robot arm example, we only need to animate one axis of rotation. It can be helpful to "lock" off the other channels so that they are not inadvertantly animated. Doing this step also streamlines making character and control nodes. (See last item below)
In this example only the Rotate Z axis of the Elbow needs to animated. Using the mouse and CONTROL key, select all the channels you do NOT want to effect. Once selected, hold down the right mouse button and select "LOCK". You now cannot change them until you "UNLOCK" them.
|
 |
Adding Attributes
Additional Attributes can be added to any object or node. These new attributes are then linked or connected to other channels, attributes, expressions, or driven keys. This allows more flexiblity and convenience in animating. By picking one node, an animator can key any number of attributes or objects.
|
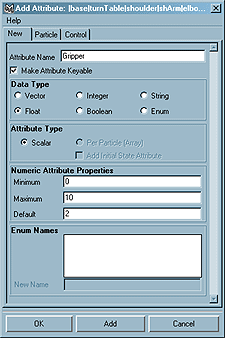
Select the Object you want to add an attribute to. In this example we are using the "wristTwist" object of the robot arm. Modify>Add Attribute Name the attribute. This name will appear as a keyable channel in the Channel Box. Select Data Type:
Minimum, Maximum, Default control the range. In this case the Gripper range will go from 0 to 10 and it will default to 2. Click "Add" to add the Attribute |
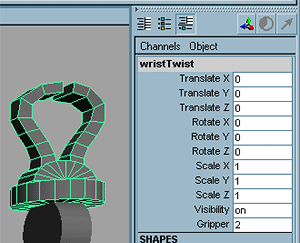 |
Select the object and the new attribute should appear in the channel box. The number can be changed, but it does nothing because the attribute is not connected to anything. In this example, you should create a set driven key where the "Gripper" Attribute (the Driver) on the wristTwist object controls the rotation of both grippers (the Drivens) so that they open and close. At 0 they should be closed. At 10 they should be wide open. With this setup, the animator can select "WristTwist" and animate both its rotation and the grippers. S/he does not have to select two different objects to do the same animation. |
Connection Editor
By adding muliple attributes to a node and using the Connection Editor to connect these attributes to existing objects and channels, an animator can make effective control nodes for animation. In this way one node can be selected and the entire "character" can be controled. This saves repeatedly picking different nodes and adjusting channels to set poses. Remember that you can select individual channels in the Channel Box, use the Middle Mouse Button to change its values, and then use the Right Mouse Button to set the key frame. You can also hit the "s" key to set a key frame for all the channels of the node.
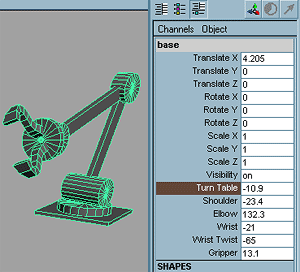
In this example, the base node for the entire robot arm has been selected and multiple attributes have been added: "TurnTable", "Shoulder", "Elbow", etc. Once these attributes are connected to the corresponding objects it is possible to animate the entire arm by picking one node. An animator can place and scale the entire arm, as well as animate all aspects of it. Use the Conncetion Editor to link these new attributes to the specific ones. |
 |
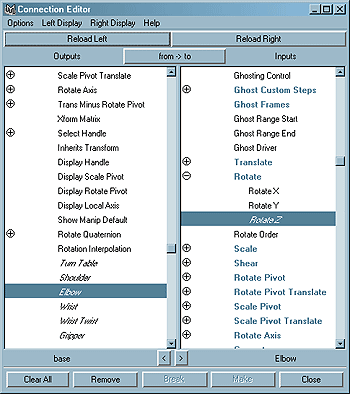
Window>General Editors>Connection Editor Load the node that will be controling everything into the left side. The outputs of these attributes will be connected to inputs on specific objects. One at a time, load in a node of the robot arm into the right side. In this example, the Elbow node has been loaded. Then click on the attributes that you want to connect. In this case the attribute "Elbow" has been connected to Rotate Z on the elbow joint. Now when you adjust the "Elbow" Attribute of the base node, it will directly effect the Elbow joint. |
 |
Create Character Node
Maya in recent versions has created an automated system for creating a control node for animation that works similarly to the above methods. The most important thing to remember that it works well if you have already indicated what channels or attributes should be animated. You do this by locking off channels that will NOT be used (see above).
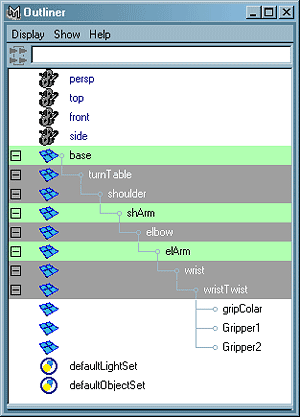 |
Create a Character Control Set only after your model is entirely ready to animate. Tweaking individual aspects of a model after the control node has been made can cause problems. Lock off any channels that you will NOT animate.
Using the CONTROL Key and Mouse, select only the objects that need to be animated. In this example, we are only selecting the robot arm joints, not the arms between the joints.
From the Animation Menu, select Character>Create Character Set.
|
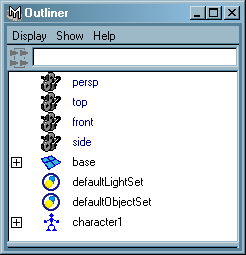 |
Maya will automatically create a node that has every channel that you have left unlocked. It gives it a cute little icon of a figure standing at ready for movement.
Select this node and you will see every attribute. They may have less interesting names than what you would have called them, but it isn't hard to figure out.
|
